Brave Frontier Guide: Combat
Now we are gonna talk about Brave Frontier combat. The combat in this game is pretty complicated, but with our Brave Frontier combat tips, you’ll get used to it soon.Brave Frontier Combat Guide: Combat UI
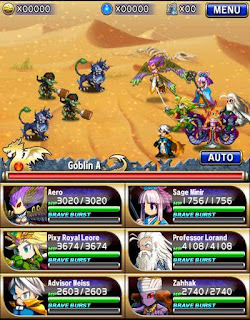
At the top of the screen are the loot stats for the current quest. From left to right, these counters track your Zel, Karma, and Units Captured. If you need a review of what Zel and Karma are good for, please refer to previous guide!
Below that is an area that shows the enemy units on the left and your own units on the right.
Below that, you’ll find the currently selected enemy unit’s health bar.
Next is all of your units and their current status. In order to attack, you must tap each of your units. Holding down on a unit brings up a small swipe menu, where you can swipe down to defend, or up and to the right to use your Brave Boost if it has charged.
Hitting monsters will drop Zel, Karma, Brave Crystals, and Heart Crystals. Sometimes you’ll also see items.
When a monster is defeated, there is a chance that it will become captured. If this happens, it will turn into a white blob and fly up to the “Units Captured” counter at the top. If you manage to win the quest, any items and units you found will be added to your inventory.
Brave Frontier Combat Guide: Items
While in combat, you can use items. The items you’ve chosen to bring along on the quest are shown at the bottom of the screen. Items are synthesized in your town, and you can carry a limited number of them into battle.
Having a stack of healing items can be a lifesaver, especially if your squad doesn’t contain a healer! Make sure you restock between quests if you’re running low. Most items are cheap to manufacture in massive quantities.
Brave Frontier Tip You can only use items on units that have not yet moved this turn. If your units have taken an action, they’ll be grayed out! If you need to use an item, do it early in your turn!
Brave Frontier Combat Guide: Combat Strategy and Spark
All you really have to do in order to take part in combat in Brave Frontier is tap your units. They will do an attack animation, (hopefully) injure the enemy, and consume their turn.
Brave Frontier Tip If left alone, your units will prioritize their own targets, and will attack new enemies when the last enemy has been killed. If you tap an enemy, your units will attack whatever enemy monster you tapped last. In some fights, there are clearly more dangerous monsters than others. In Boss Fights, tap these tougher monsters in order to prioritize them! You can leave the weaklings for later. Alternative Strategy is that you should kill off the weaklings first to reduce the number of attacks you take. I think either way we can agree that targeting your units in a boss fight is a smart move.
If your units attack at the same exact moment, there’s a chance they will cause a Spark to occur. Sparks boost the amount of loot that drops, and they’re worth trying for. You’ll have to time your taps on each unit so that their attacks connect as close to the same time as possible. As you practice with a squad of units, you’ll get better at predicting exactly how long the combat animation will take, and this will help you master Brave Frontier’s Spark mechanic.
Brave Frontier Tip The first time you play with a new unit, let it attack by itself so that you can get an idea as to what its attack looks like and how long it takes to complete. This will help you determine what order you need to attack in, and where you should insert delays between tapping of units.
Brave Frontier Combat Guide: Brave Burst
Most units have a “Brave Burst” that charges during a quest as that unit gathers Brave Crystals. When fully charged, you can launch the Brave Burst by holding your finger on the unit and then swiping upwards and to the right.
Brave Bursts fall into three categories:
- Attack Bursts deal damage to enemy units, and they can also cause status effects.
- Healing Bursts heal your units, and sometimes also grant positive status effects.
- Support Bursts give your team positive status effects.
There’s some strategy as far as when you use your Brave Bursts – ideally, you want to use them on the final fight in the quest, which is usually against a powerful boss. However, your Brave Bursts will probably charge earlier in the quest, so you might as well make use of the excess Brave Crystals if you’re feeling confident they’ll recharge in time.
If you want to level up the power of your Brave Bursts, you can do so via Fusion – check out our Units Guide for all the details.
Brave Frontier Combat Guide: Elements
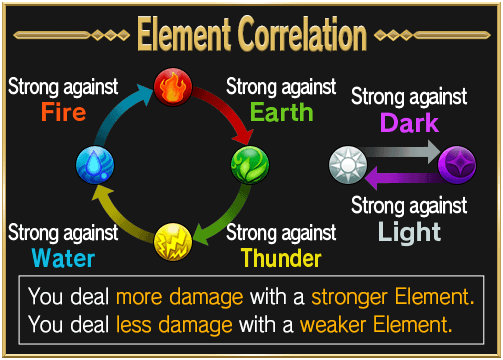
Each unit has an element – we covered that in the Units Guide. Each element is strong against other elements. When a monster is selected, your units will have an icon if their element and the enemy element interact in some way:
The elemental affinities in Brave Frontier are as follows:
 |
| Elements |
Brave Frontier Tip Many quest chains also have specific elements that they feature heavily. It’s a good idea to put together at least a couple of squads that feature particular elements while leaving others out so that you can take advantage of this knowledge. For instance, if you’re in a “forest” area, chances are a squad of Fire units is going to really clean up.


No comments:
Post a Comment